There’s an undeniable magic in a homemade gift, a warmth that store-bought items simply can’t replicate. And when that gift is a batch of perfectly crunchy, sweet-and-salty homemade peanut brittle, you're not just giving a treat; you're delivering a memorable experience. This isn't just any candy; it's a nostalgic delight, a testament to thoughtful effort, and a guaranteed crowd-pleaser that will truly wow your loved ones. Forget the stress of holiday shopping; embrace the joy of creating something truly special with an unbeatable peanut brittle recipe.
Making peanut brittle might sound intimidating, but with the right approach and a few expert tips, it's surprisingly straightforward. The key lies in preparation and precision, ensuring that every batch you make is a masterpiece of brittle perfection. From the rich aroma that fills your kitchen to the satisfying snap of the finished candy, every step of this Easy Old-Fashioned Peanut Brittle: Homemade Perfection journey is a rewarding one. Get ready to transform simple ingredients into a dazzling gift that speaks volumes.
Why Homemade Peanut Brittle Is the Ultimate Gift
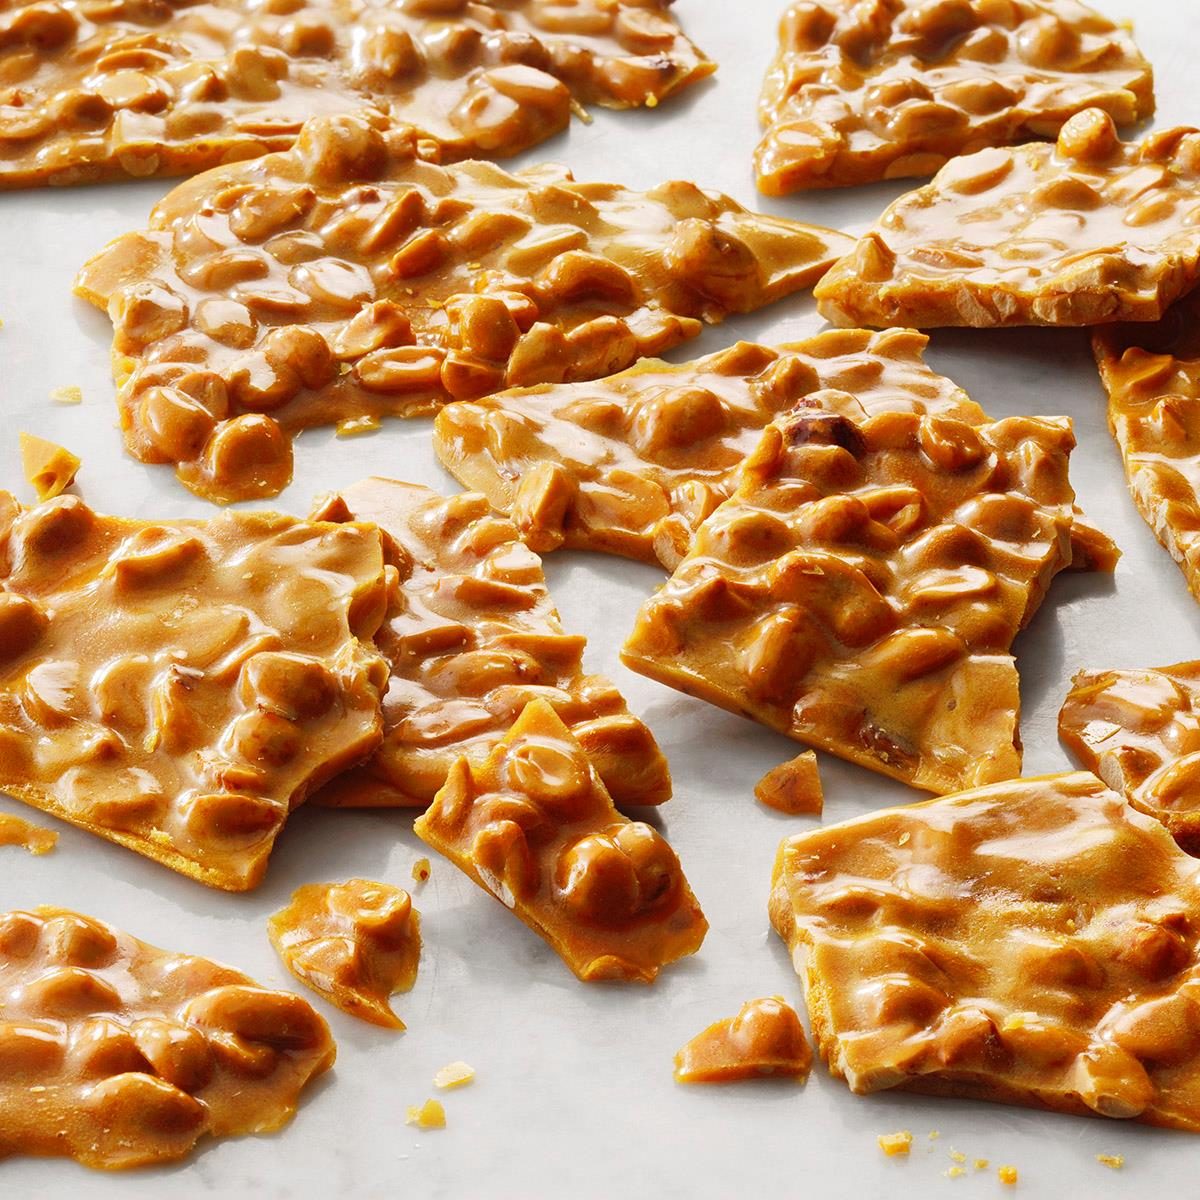
Imagine the delight on someone's face as they open a carefully wrapped tin, revealing shimmering, golden shards of peanut brittle. The visual appeal alone is captivating, but the first bite is pure bliss: a harmonious blend of sweet caramelized sugar, savory roasted peanuts, and that signature, satisfying crunch. This isn't just candy; it's an heirloom recipe in the making, a taste of tradition, and a symbol of care.
Homemade peanut brittle stands out for several reasons:
- Unforgettable Flavor: The balance of sweet and salty is addictive, creating a more complex and satisfying taste profile than many other confections. The slow caramelization of sugar brings out deep, nuanced flavors you won't find in mass-produced candies.
- Sensory Experience: From the moment it leaves the saucepan, the irresistible scent of toasted peanuts and warm sugar permeates your home. Then comes the satisfying snap as it cools and breaks, followed by the unparalleled crunch in every bite.
- A Touch of Nostalgia: For many, peanut brittle evokes fond memories of childhood, holidays, and simpler times. Gifting it is like sharing a piece of history and comfort. It's a classic for a reason, always a hit at any gathering or as a thoughtful token.
- Personalized Effort: The act of making something by hand demonstrates genuine affection and effort. It shows you've invested time and love, making the gift far more meaningful than a store-bought alternative.
- Versatility: Perfect for any occasion – holiday gifts, hostess presents, thank-you tokens, or just because. Pack it in decorative tins, cellophane bags, or mason jars with a personalized tag, and you have a gift that truly wows.
The Essential Peanut Brittle Recipe: Ingredients for Success
The beauty of this classic peanut brittle recipe lies in its simplicity. You likely already have most of these pantry staples on hand. However, understanding the role each ingredient plays is key to achieving that perfect crunchy texture and rich flavor.
Gather Your Ingredients:
- Granulated White Sugar: This forms the crystalline backbone of your brittle. It's the primary sweetener and provides the structure when caramelized.
- Light Corn Syrup: Don't skip this! Corn syrup is crucial for preventing the sugar from crystallizing, ensuring a smooth, glassy, and non-grainy texture. It also helps achieve the ideal "hard crack" stage.
- Water: A small amount of water helps dissolve the sugar evenly at the beginning of the cooking process, ensuring uniform caramelization and preventing scorching.
- Salt: A pinch of salt is a flavor enhancer, balancing the sweetness and bringing out the nutty notes of the peanuts. If you opt for salted butter, you might reduce or omit this extra salt.
- Raw Peanuts: The star of the show! Many prefer raw peanuts with their skins on for a darker, richer brittle, as recommended by culinary producer Nicole McLaughlin (NicoleMcMom). Roasting them in the sugar mixture as it cooks imparts a wonderfully deep, nutty flavor.
- Unsalted Butter: Adds richness and a delightful, smooth mouthfeel to the brittle. Using unsalted butter gives you control over the overall salt content.
- Baking Soda: This might seem unusual, but baking soda is the secret ingredient for that distinctive airy, brittle texture. When added to the hot syrup, it reacts to create tiny carbon dioxide bubbles, which are then trapped as the candy cools. This aeration makes the brittle light, tender, and easy to break, rather than rock-hard. You'll literally see little pockets of bubbles around the edges, a sign you've made it correctly, according to NicoleMcMom.
Pro Tip: As NicoleMcMom wisely advises, mise en place is non-negotiable. Have all your ingredients measured out and ready to go before you even turn on the stove. "There's no time for dilly-dallying," she warns, and she's absolutely right. The brittle-making process moves quickly, and you won't have time to measure in between steps.
Mastering the Method: Your Step-by-Step Guide to Perfect Brittle
Making peanut brittle is a dance between precision and quick reactions. A good quality candy thermometer is your best friend here, ensuring you reach the exact temperature needed for that perfect hard-crack consistency. For more detailed insights into achieving the ideal crunch, explore our guide on Perfect Peanut Brittle: Achieve Crunchy, Airy Texture Easily.
The Process:
- Prepare Your Workspace: Grease a large baking sheet (or two smaller ones) thoroughly with butter or a non-stick cooking spray. Have it ready right next to your stovetop, as you'll need to pour the mixture immediately.
- Initial Syrup Creation: In a heavy-bottomed saucepan (this is important for even heat distribution and preventing scorching), combine your pre-measured granulated sugar, light corn syrup, and water. Stir gently over medium heat until the sugar is completely dissolved. Avoid vigorous stirring once it starts to boil to prevent crystallization.
- Bring to a Boil & Add Peanuts: Once the sugar is dissolved, increase the heat slightly and bring the mixture to a rolling boil. Stir in your raw peanuts. At this point, attach your candy thermometer to the side of the pan, ensuring the bulb is submerged in the syrup but not touching the bottom.
- Cook to Hard-Crack Stage: Continue cooking, stirring occasionally to prevent the peanuts from sticking, until the candy thermometer registers at least 300°F (149°C). This is the "hard crack" stage, where the sugar mixture becomes extremely hot and brittle when cooled. Patience is key here; don't rush it.
- No Thermometer? No Problem (but proceed with caution): If you don't have a candy thermometer, you can perform a cold-water test. Once the syrup appears thick and golden, drop a small amount into a bowl of very cold water. If it immediately forms hard, brittle threads that snap easily, it's ready. If it's chewy or soft, keep cooking.
- Remove from Heat & Finish: Immediately remove the saucepan from the heat once it reaches 300°F. Swiftly stir in the unsalted butter until melted and fully incorporated. Then, quickly stir in the baking soda. The mixture will foam up significantly as the baking soda reacts – this is exactly what you want, creating those signature air bubbles.
- Pour and Spread: Without delay, pour the hot, aerated mixture onto your prepared baking sheet. Working quickly, use a heat-proof spatula or the back of a greased spoon to spread the brittle into a thin, even rectangle. The thinner it is, the more brittle and delicate it will be. Be cautious, as the syrup is extremely hot.
- Cool and Break: Allow the brittle to cool completely and undisturbed at room temperature. This can take anywhere from 30 minutes to an hour, depending on your kitchen's temperature. Once firm and cool to the touch, use a kitchen mallet, the back of a sturdy spoon, or even just your hands to break the brittle into irregular, gift-worthy pieces.
Tips and Tricks for Brittle Perfection (and Gifting)
Beyond the basic steps of this peanut brittle recipe, a few additional insights can elevate your homemade candy from good to truly exceptional.
Achieving the Perfect Texture and Flavor:
- Heavy-Bottomed Pan: Using a heavy-bottomed saucepan is paramount. It distributes heat more evenly, reducing the risk of scorching the sugar, which can lead to a bitter taste.
- Don't Stir While Boiling (Initially): Once your sugar, corn syrup, and water mixture comes to a boil, avoid stirring too much until the peanuts are added and you're nearing the hard-crack stage. Stirring can cause sugar crystals to form on the sides of the pan, leading to a grainy texture.
- Temperature Accuracy: Calibrate your candy thermometer regularly. An inaccurate reading can result in soft, chewy brittle or burnt sugar.
- Watch for Color: The syrup will turn a beautiful amber or golden-brown color as it approaches the hard-crack stage. This indicates the sugar is caramelizing and developing its deep flavor.
Storage and Gifting Brilliance:
- Proper Storage: Once completely cooled and broken, store your peanut brittle in an airtight container at room temperature. This will keep it fresh and perfectly crunchy for one to two months. Humidity is the enemy of brittle!
- Avoid Refrigeration: Do not refrigerate peanut brittle. The moisture from the fridge will cause it to soften and become sticky, losing its signature crispness.
- Freezing for Longevity: While refrigeration is a no-go, you can freeze peanut brittle for up to three months. Store it in zip-top freezer bags or airtight freezer-safe containers. Be aware that freezing might slightly alter the texture upon thawing, making it a tiny bit softer, but it will still be delicious. Thaw it at room temperature.
- Presentation is Key: For gifts, consider elegant packaging. Line a decorative tin with parchment paper, arrange the brittle pieces, and tie it with a festive ribbon. Small cellophane bags tied with twine, or mason jars filled with brittle, also make charming presentations. Add a handwritten tag for a personal touch!
- Dark vs. Light Peanuts: As Nicole McLaughlin notes, using raw peanuts with skins on can contribute to a darker, richer finished brittle, which she and her family prefer. Experiment to find your favorite!
With these comprehensive tips and a reliable peanut brittle recipe, you're well on your way to crafting impressive, homemade gifts that are sure to leave a lasting impression. The effort you put in will be evident in every delicious, crunchy bite.
Homemade peanut brittle is more than just a sweet treat; it's an expression of love, care, and a touch of culinary magic. This comprehensive peanut brittle recipe, complete with crucial tips for success, empowers you to create stunning, delicious gifts that will truly "wow" your loved ones. From the rich, nutty aroma filling your kitchen to the satisfying snap of each golden shard, the entire process is a joy. So, gather your ingredients, prepare your workspace, and get ready to create edible masterpieces that bring smiles and cherished memories. Happy brittle-making!
